
4. Materials & Textures
introduction and basic advice on texture/material application
Author: bac9-flcl
introduction and basic advice on texture/material application
Author: bac9-flcl
4.1. Introduction
First, let's cover some basic facts.
- All the textures you utilize in your model were actually embed in the file right after you pointed at them.
This leads to several pros and cons, namely you don't need to have the constant access to a heavy texture library to edit some models, but on the other hand there is a significant performance/memory/filesize hit if embed textures are huge. You should also understand that due to that feature, SU models store no paths to the textures, and therefore for export plugins (e.g. PlayUp) it is impossible to determine the proper location of the texture - they usually extract the textures in some new folder, e.g. a subfolder near the exported object itself.
- SketchUp supports a dozen of image formats: JPEG, PNG, TGA, TIF, BMP, and eved PSD. The DDS image format is not supported.
The first thing you should note there is .tif texture format support, - which is simply awesome because you don't need to convert your textures to any additional format: just use the CryTif output. Though if you want to reduce memory/performance footprint, it's worth to keep JPEG copies of every texture in the library and use them for SU instead.
- The only texture mapping types available in SketchUp are planar and basic perpendicular mapping; no UVW unwrap tools available.
This means that complex organic shapes like character models or complex props like weapons can't be properly textured in SketchUp. However this does not necessarily applies to simple organic objects (e.g. trees) or not too complex props (e.g. bus or computer terminal models with unique textures and simple manual unwrap)
")
")
Also, I am going to assume you've already prepared your own nicely organized texture library with .tif/.dds CryTif final output. It's not a problem if you store .psd source files or .jpg copies there too - it's useful to have everything in one place and besides, these last ones can also be used for SU.
4.2. Materials
Material and texture are different terms. Material is an entity, that is what you are applying on your model surfaces, and a texture is the one of it's properties.
However, while the material is usually associated with a kilometer-long substance containing thousands of settings, shader properties and so on, the ones you encounter in SketchUp aren't that complicated. Here it serves only one purpose: contains the texture and a tiny number of texture-related parameters.
Let's create new material. Click on the
 "Create material" button. The following window will be opened:
")
The only thing you really need to set up there is the texture file itself, and the default size of the texture. Once you're done with that, click OK and that is done with.
")
Remember what I've told you earlier: you should not use the built-in material library!
You should also note that if you'll click the "Create material" button while having some already existing material selected, the new material will be the duplicate of it. Of course these will be just default values, you can still change size, texture file or anything else to your liking in this case.
Let's examine several material properties more closely:
1. Name: not really important, default ones should work fine. You might want to change it to have a nicely organized material list, but that's all, at least for the current moment.
2. Use texture image: self-explanatory; in 99% cases this should be turned on.
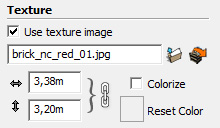
3. Size: allows you to set the default size of the texture. Now that is an interesting subject to talk about.
Basically, you should know (at least the approximate) real physical size of every texture you've used in your library, especially if we're talking about brick walls or other surfaces with strictly fixed features scale. For example, judging by the brick type and count, this texture is of a 4,34x4,34m size:
")
While this one is precisely of a 3,38x3,20m:
")
Keeping eye on that makes your workflow easier (e.g. you can easily determine the building height from a single blurry reference photo) and makes your objects more realistic: good material and element proportions are always a plus in my book.
In some cases, the size determination of the texture proves difficult, - for example, if we're talking about a tiled rust texture where you won't usually find any features to reference real size from:
")
Then you should refer the modeling guidelines by Crytek. Here's some quotes from these:
- The texture size that you should use for an object is related to the amount of space that the object will use on screen. For Crysis, Crytek aimed for a screen resolution of 800 x 600 pixels. Let's assume that the object will fill half the screen's height at all times (600/2 = 300 pixels); therefore, you should use at least a 256 x 256 screen, and 512 x 512 will be even better. The best case scenario will be to have 1 pixel on screen represent one pixel in the texture. Of course, this depends on how big the object is in all the dimensions, as you can't really translate the texture space in 2D directly to the amount of space it will use in 3D.
- Try to keep the texel ratios for all objects, constant. This means that every object on screen uses roughly the same amount of texture pixels per meter. By doing this, you will ensure that all the objects have roughly the same sharpness on screen and that the textures don't look muddy.
- Objects that are always on screen and at the same distance to the player (for example, weapons) can use a higher texel ratio in areas that are closest to the player (butt-stock, iron-sights, and the like).
The easiest approach would be to just determine the resolution of textures you want to have on your environment. It's like deciding about DPI for image prints: choose some pixel per meter budget and stick to it. For example, I tend to use 512x512 pixels of diffuse texture per square meter (for areas that are closely observed by the player during the gameplay).
For mainstream configurations or projects with high amount of unique content I'd recommend 512x512 per 2 meters, - for example, STALKER utilized that scale. You should also keep in mind that you can always compensate the lack of diffuse resolution with techniques like detail bump or detail subtextures.
All your real-sized textures should also reference the the budget in the first place. For example, the aforementioned brick walls, if encountered closely by the player, should use 1024x1024 texture as this is the resolution for 4 square meters surface and their size is close to that.
Of course there are some exceptions and additional factors, many of them are covered in the aforementioned guidelines. Read that wonderfully useful document. So, why exactly do I care so much about the default texture size in your material settings if you can resize the texture anytime during the modeling workflow?
Because it makes your texturing workflow extremely fast, that's why.
4.3. Texture mapping
get yourself a coffee and a pillow, it'll be the long story
The SketchUp is well-known for the fast modeling process, and texture mapping is not an exception: you can apply the textures to the some generic building in just several minutes, and I'm not talking about some randomly oriented misaligned slapping, - nope, we'll get the perfectly aligned seamless texture mapping.

So how do we achieve that? Let's examine the way texture mapping works in SketchUp first.
")
Here's the example scene with some geometry of varied complexity. It also includes the fashionable orange placeholder texture, just like the one Valve guys have. Download it, could be a useful scene to start practicing with the texturing: http://www.playuptools.com/downloads/extras/MaterialExample.skp
The first stage of the texturing is applying the material to a surface. Pick the Paint Bucket tool and watch this tutorial first:
Unfortunately, this video covers only the basic material functionality that mostly won't be used for game-targeted models at all. But you should learn how to use the Paint Bucket tool just fine from it.
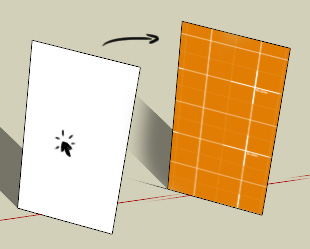
When you click on the face with the Paint Bucket tool, you apply the material to this face, and then the texture specified for this material instantly appears on the surface.
")
Somewhat proper texture mapping is already there: you don't need to additionally specify the projection direction or participate in other fun activities e.g. 3ds Max is famous for.
No matter how your face is oriented, by default you'll get the perpendicular mapping, without any distortions.
How the actual position of the texture is determined? Actually, there is no pan or other directional shifts present: the texture is located on the 0;0 position in UV space and you just see the tiling of the texture that got to your face. Let me show you the simple illustration so that you'll understand how projection plane is determined and what affects the default texture position on the face.
")
Or a slightly more complicated face orientation:
")
Ok, so now we understand how default texture mapping works and why everything we simply fill with the Paint Bucket tool looks how it looks. Now, why I said we won't use default texture position most of the time? Here are several examples, some of them featuring the desired texture position which is not achievable with default mapping.
")
")
")
")
SketchUp is not some telepathic magician, so you should excuse him for these cases - it can't predict what position do you actually need. But we're still in a sweet situation, because, remember: we don't even need to setup the projection orientation for any faces, the textures are always applied perfectly straight and proportional. All we need to do is to change their position to a desired one.
In order to edit it, right-click on the face and choose Texture -> Position in the context menu:
")
The following interface will appear:
")
It is very intuitive and pretty much self-explanatory. You can pan the texture in the plane of the face by dragging it with the cursor, and you have 4 controller pins that you are usually dragging to transform the texture.
- Object position is snapped to the red pin: you can, for example, hold it with your left mouse button and snap the border of the texture to the particular vertex or an edge.
- The green pin is controlling the proportional scale of the texture (with the relative distance to the red pin) and the rotation angle of the texture (with red pin being a center of a virtual circle). Sounds complicated, but you better try it yourself, it's very easy and intuitive to use.
- The blue pin controls the vertical non-proportional scaling of the texture (move it closer or farther from the red pin on the vertical axis to see the effect) and the texture skewing. This is used relatively rare as the texture size is usually proportional (or, in case of a slightily irregular size, proportions are defined in the material properties). If used, is often combined with the green pin to produce an arbitrary non-uniform scaling. Use with caution to avoid horizontal movement of the pin: the skewing must not be used to avoid problems with UV coordinates convertation in other 3d file types.
- The yellow pin controls the perspective distortion of the texture and should not be used in any circumstances, as it is not supported in the common UV coordinate formats.
Take your time and practice these. It normally takes only a few seconds to configure the mapping on a surface.
Also, I remind again: never use the horizontal skewing (controlled with horizontal movement of the blue pin) and the texture distortion (yellow pin), - these types of texture transformation are not supported with the majority of 3d file formats, including CryEngine3 ones. I can't stress this enough.
Ok, so now we know how to properly position any texture, and have a good predefided default texture size (so that in most cases we don't even need the scaling functionality, only panning and rotation). But manually configuring every surface, even when so few actions are left, is still way too slow. How to speed up the workflow?
")
In the next example I will utilize this relatively complex object and the upgraded version of our fashionable placeholder texture, which will help us to clearly visualize the texture mapping features.
")
So, we need to cover all there surfaces with properly rotated and positioned textures. We start with the first face:
")
We edit the rotation (green pin) and position snap point (red pin):
")
Then we hit the Enter key and it's done with. But we don't wan't to repeat the same operation all over again for every face. So that's when we should use the Sample tool.
Press and hold the Alt key to change from the Paint Bucket tool to a Sample tool for sampling materials within your model. The cursor will change to an eye dropper.
 Click on the face whose material you want to sample. Then release the Alt key to return to the Paint Bucket tool and paint the sampled material on a face.
What's so awesome about this tool is that not only does it sample the material type, but also the texture mapping itself. Let's see that on the example: we'll sample the material from our face and then will apply the material on the parallel faces around.
")
If we examine the mapping with the edit mode, as you can see, it is perfectly aligned:
")
Another example:
")
Well, we can still say it's not a big deal - these examples only applied on parallel surfaces, so we'll need to manually set up the position and rotation again for any new face orientation.
Wrong! The most awesome thing about the texture mapping sampling is that it even translates the mapping onto the adjacent surfaces. Here is an example:
")
It's like you're covering the object with wallpaper: the mapping is perfectly aligned, continuous and solid. You should also note that you can sample the previous face every time you paint the next one (over time the pressing Alt hotkey during the texture mapping would become an unnoticeable instant action), making the long sequences of faces with awesome seamless mapping:
")
It applies to more complicated cases too, e.g. the sampling perfectly continues rotated texture mapping on the new face without any seams:
")
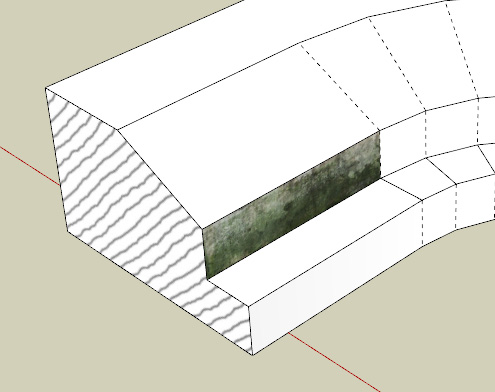
Important note: You should know that the texture mapping sampling only works for the faces with attached texture position. Here's what I'm talking about: as you remember, there is a default texture mapping that applies your texture with projecting it prom the 0;0 point of corresponding plane. That means that the texture is not attached to the face position. You can try it yourself: move a face like that:
")
Having a default texture mapping basically means having no specific texture position information in your face. And as no specific information is available, sampling the material from such faces will have no effect: the same default mapping will be applied on the next areas you'll click at.
But permanently attaching the texture position to the face is very easy: just open the Texture -> Position edit mode and close it with hitting the Enter key. You don't even need to edit the position or touch the pins if you don't want to. Then it's done with, now the texture is placed relatively to your face and can be sampled alright.
You can easily determine what faces store the position information and what aren't by moving them: as you've seen above, the faces without any are exhibiting displacement of the texture even when the surface itself is selected. Faces with the position information are keeping the texture in place no matter how you move them: the only way to reproduce the displacement is to deselect the face itself and move it with the border edges.
")
Okay, I hope you aren't asleep yet. Sorry for long explanations, these things are utterly basic and should have been covered. Please be patient, there not too much stuff left thanks to the wisdom of SketchUp design team. )
Here's the tip on the texture sampling: actually, you don't need to press the Alt hotkey and sample every subsequent face in order to produce seamlessly painted sequence of faces: sample the texture mapping only once and then just click on the next faces, one by one, following the sequence. If there's no distractions for SketchUp texture mapping algorithm (e.g. some faces with the same material and different coordinates that are adjacent to the sequence somewhere), it'll automatically apply the proper texture positions for every face:
")
This also applies to more complicated cases like arcs with several adjacent face sequences. All that matters is the proper order of faces you click on:
")
")
Let's see what's left to explain yet. You should know about this useful context menu (right-click on the texture in the position edit mode):
")
And all that's left is one complicated case. At the moment you know how to apply textures to surfaces like this:
")
And like this:
")
But what should we do with that kind of surface?
")
The faces there are twisted along several axes, and simple sequential mapping translation won't do, - we'll get unattractive seams. Well, there is a solution: Projected texture mapping mode (with which you're probably already familiar with from 3ds Max/Maya, where it goes under the name of "planar mapping").
I works very simple: you can fix the projection orientation for a certain face and then translate it to other faces. Looks like a projector.
Let's cover our surface with seamless texture utilizing the projected mode (by the way, as you've probably already noticed, practically every object I used to illustrate this tutorial is included in the model I've shared in the beginning, so you can repeat and practice all the examples).
Create the new simple rectangular surface over the existing one and set the desired texture mapping on it:
")
Try to sample it down:
")
As you can see, it's pointless to sample that mapping: all the faces below have different orientation and different projection plane. The correction of sampled mapping to new projection plane leads to different results on every face, so all we get is a mess with seams on every edge. Let's fix that. Right-click the face above and activate the Texture -> Projected mode from the context menu:
")
Now try to sample the mapping to the faces below:
")
I've applied smoothing and hidden the edges for the sake of clearness of the illustration.
As you can see, individual projection direction is not utilized there: every face has uniform projection and texture parameters. By the way, of course you can do it without the additional face, just adjust the projection mode to some suiting face on the surface and sample the mapping from it. I've just used the additional face to make everything clean and accurate: to ensure that the projection plane is horizontally oriented and to get the texture properly positioned.
This technique is particularly useful for geometry of certain types, like terrain, mud/garbage/leave piles props, and basically in every other case of surfaces which are curved in multiple directions. For example, there it was used for the dust and for hertical/horizontal slice texture projections:
")
I suppose that's all for now on materials and textures. With all these rules and techniques in mind, you'll be able to cover the object of any complexity with a wonderfully accurate texture mapping. Have fun.
>> PART V: Export to CryENGINE 3 <<